Click here if you’re looking for custom cookies for your event, party or wedding?
25
March
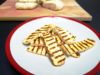
Homemade Halloumi
I bought my husband a halloumi making kit for Christmas. We finally got around to having a go with it a few weeks ago. It didn’t go well. The instructions were fairly vague, I think due to a bad translation, and the supplied equipment wasn’t really up to much. Not to be deterred, I did a bit of reading, watched a few videos, and tried again.
This time, it was a success!
If you are not familiar with halloumi, it is a Cypriot cheese, and due to the fact that after pressing, you boil the curds in the whey, it makes it head resistant. This allows you to grill it in a pan or on a BBQ.
If you want to have a go at doing this, there are a few bits and pieces you will need to pick up first – but stay away from the kits is my advice.
Equipment
- Large pan – a big soup pot with at least 5 ltr capacity is ideal
- Rennet – I used tablet rennet, but you can use the liquid version equivalent
- Cheesecloth – you need a 2ft square to ensure no spillage of curds
HOMEMADE HALLOUMI
COOK TIME
3 hrs
Homemade version of the traditional Cypriot cheese, halloumi
COURSE:
Snack
CUISINE:
Cypriot
SERVINGS: 4
INGREDIENTS
- 4 litres Whole Milk
- ¼ tablet Rennet
- 50 ml Non-chlorinated water
- Cheese Salt (or Kosher Salt)
- Dried Mint (optional)
INSTRUCTIONS
-
Dissolve the rennet in 50ml of water
-
Place all the milk into a large pot that has a lid. Heat gently to 32°C, then turn off the heat. Stir the rennet in well, ensuring it is well distributed. Place on the lid, and leave for 45-60 minutes until the milk has set to a jelly-like consistency
-
Using a large knife, run the knife through the set milk in vertical lines about 2cm apart to seperate the solids (curds) and liquid (whey). Repeat this horizontally to ensure your curds are cut into small pieces
-
Give the curds a very gently stir then leave undisturbed for a further 5-10 minutes
-
Turn the heat back on but low, and heat up to 40°C, which should take about 20 minutes, stirring very gently throughout
-
By this point, your curds should have contracted as they have expelled more whey. Place the lid back on, and leave for 10 minutes to allow the curds to settle to the bottom of the pot
-
While the curds are settling, line a large colander with a piece of cheesecloth at least 2ft square. Get a helper to hold the colander over a bowl (or if you have a jelly stand, you can use this) as you want to retain the whey. Slowly pour the whey and curds into the colander so they whey is strained into the bowl, and the curds are gathered in the cheesecloth
-
Lift the edges of the cheesecloth full of curds and place on a wooden board. Fold in the sides of the cheesecloth and then the top and bottom, holding the curds in a tight rectangle. Place a second chopping boards on the top and weigh this down. You can use your empty milk cartons filled with water for this
-
Once the curds have been pressed for 15 minutes, lift off the top board and carefully flip the curd mass over. Leave for another 15 minutes. The curd mass should have knitted together to be a thick pancake of cheese.
-
Carefully remove the cheesecloth and leave the cheese on the board. Using a sharp knife, cut into 4 even pieces.
-
Put the reserved whey into the pot and heat to 95°C. Skim off any extra curds that may form. Place the pieces of cheese gently into the hot whey, and bring to the boil. Once the whey is boiling, turn the heat off, and replace the lid then leave the cheese to cook for a further 45 minutes. It is this essential step that makes halloumi resistant to melting
-
Check the halloumi after about 45 minutes. The pieces should have floated to the surface. If they haven't, heat the whey back to almost boiling then turn off the heat and allow to sit for a further 15 minutes
-
You may need gloves on for this next bit. Place cheese salt (and mint though this is optional) into a small tray. Fish out a piece of the halloumi and dip all sides in the salt then place on a cooking rack lined with a sushi mat or more of the cheesecloth to cool.
-
The halloumi is ready to eat at this stage, but it will taste better if left 24 hours, allowing the salt to infuse. Keep in an airtight container for 5 days, or if you vacuum seal, you can keep in the fridge for up to 6 months

Leave me a comment...