Click here if you’re looking for custom cookies for your event, party or wedding?
14
October
Pumpkin and Cheese Tortellini
Knowing how to make your own pasta is a useful skill to have. You can roll it out with a rolling pin, but your life will be so much easier with a pasta roller. You can get ones that clamp to your worktop, or ones that attach to a mixer. The latter involves far less elbow grease.
Making my own tortellini was a fun, but a time consuming exercise. The finished result was unsurpassable though. Definitely worth all the rolling, cutting, folding and pinching. My suggestion is make a large batch, put on your favourite playlist, and make a whole bunch. Uncooked, they freeze extremely well. How impressive would it be to be able to pull out a batch of your own tortellini at the next dinner you host? You could serve these with a cheese sauce, but they should be allowed to be centre stage so a simple butter and lemon sauce. Feel free to toss in some fresh sage leaves.
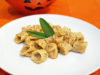
PUMPKIN AND CHEESE TORTELLINI
Hand made pasta filled with a savoury pumpkin and cheese filling, in a simple butter and lemon sauce
COURSE:
Main Course
CUISINE:
Italian
INGREDIENTS
PASTA
- 140 grams Semola Rimacinata or '00' Flour
- 2 Free Range Egg
- 1 teaspoon Salt
FILLING
- 225 grams Pumpkin Puree
- 1 Free Range Egg
- 100 grams Freshly Grated Parmesan
- ½ teaspoon Freshly Grated Nutmeg
- 1 teaspoon Dried Sage
INSTRUCTIONS
-
Sift the flour into a bowl with the salt, and make a slight well in the centre
-
Lightly beat the eggs together an pour into the well
-
Using a fork or your fingers, mix the egg pulling in a little bit of flour at a time until all the flour is mixed in
-
Press the mixture together, then drop onto a lightly dusted surface, and kneed until smooth and pliable
-
Once kneeded, wrap tightly in cling film ensuring you remove any excess air, and chill in the fridge for at least an hour
-
Whilst the dough is chilling in the fridge, make your filling. Place the puree in a large bowl and whisk until smooth
-
Add in the grated cheese, egg and spices, and whisk again until mixed thoroughly. Cover, and keep in the fridge until you need it
-
Once the pasta dough has had time to chill, cut out a quarter and pass through the thickest setting on a pasta roller. Do a double fold into a nice rectangle, and pass through the roller again
-
Dusting regular to keep from sticking, pass the dough through the roller, reducing the thickness with each pass until you have it at the second to thinnest setting
-
Gently lay the pasta on a floured worktop. Using a round fluted cutter, about 6cm diameter, cut out as many circles as you can. Press the scraps together and re-roll
-
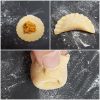
Have some water in a small bowl to hand. Place about a ½ teaspoon of filling in the middle of each circle. Using a finger, brush a little water all around the edges
-
Fold the pasta in half and press together, expelling any excess air. If you prefer, you can press the edges with the tines of a fork
-
Pick the folded pasta, and fold the pointed ends inwards, dabbing a little water to help stick them together
-
Place the folded tortellini on a floured baking sheet and cover with a tea towel. Repeat the process for the rest of the pasta
-
When ready to serve, boil the pasta in salted water for about 3-4 minutes
-
Meanwhile, add some butter to a frying pan and add a squeeze of lemon juice. When the butter starts to go golden pour over the pasta
RECIPE NOTES
You can freeze the tortellini before it's cooked. Just place in a freezer bag and remove as much air as possible (I do this by sucking it out with a drinking straw). Keep for up to 3 months.

Leave me a comment...