Click here if you’re looking for custom cookies for your event, party or wedding?
Chocolate and Peppermint Fudge
As usual, rather than falling foul of the commercialism of Christmas, I chose to make edible gifts for friends and family. I like to send a fudge, some chocolate bark, cake pops, some candy, a traditional European seasonal biscuit, and some iced cookies. I try to use seasonal flavours too.
This is about the fourth or fifth year I have sent edible gifts, and I have received positive feedback, so I think everyone appreciates it. Who doesn’t like something sweet at Christmas? Plus, your gifts are bought with something that can never be replaced or bought – your time.
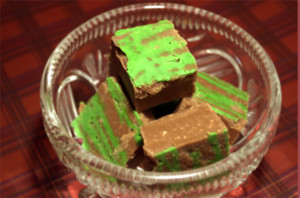
First on this year’s cast of characters is the fudge – and this year I went for Chocolate and Peppermint fudge. Rather than just adding some peppermint to a simple chocolate fudge, I decided to experiment with the design and only flavoured some coloured white chocolate that was swirled on the fudge.
Wrap in some festive cellophane, and you have a delightful gift for friends, family or neighbours. It will keep for ages too, so you can make this well in advance.
Chocolate and Peppermint Fudge
Ingredients
- 25g White Chocolate
- Green food colouring paste
- Peppermint food flavouring
- 500ml Double Cream
- 500g Caster Sugar
- 75g Dark Chocolate
- 75g Milk Chocolate
- 1 teaspoon Vanilla Extract
Directions
| 1. | Line a deep baking tray (approx 9"x9") with a couple of layers of cling film |
| 2. | Melt the white chocolate in a glass bowl over a pan of gently simmering water. Once melted, add green food colouring paste and a generous amount of peppermint flavouring |
| 3. | Put the green chocolate into a piping bag, and drizzle over the bottom of the pan |
| 4. | Put the sugar and cream into a large heavy bottomed pan, preferably a preserving pan, over a moderate to low heat. Stir gently and continuously until the sugar has melted, then turn the heat up |
| 5. | Stir occasionally to prevent the mixture burning, and heat until the mixture reaches 'soft ball' stage. If you have a sugar thermometer, heat to 235°f / 115°, or you can check for soft ball stage by dropping a small amount into some iced water. If the mixture can be pressed into a soft ball, it is ready |
| 6. | Turn off the heat and move to a cool surface. Leave for 5-10 minutes to cool a little. Add in the chopped milk and dark chocolate and the vanilla, then beat in |
| 7. | Continue to beat until the mixture just starts to lose its glossy appearance. Working quickly, pour the mixture into the prepared pan and smooth the surface with a metal spoon |
| 8. | As it starts to cool, score the surface into portions |
| 9. | Leave to cool for a couple of hours before turning out carefully, and breaking along the score lines, or cutting with a sharp knife |
 Print recipe

Leave me a comment...